Tensorflow 改装 inception-v3
Table of Contents
1 根據特定應用改裝 inception-v3
本节不包含代码, 只是介绍如何使用 tensorflow 的 hub 包中的预置的训练好的模型, 来训练自己的任务.
1.1 修改 inception-v3 的原理
inception-v3 是 1000 分類問題, 其最後幾層是這樣的.
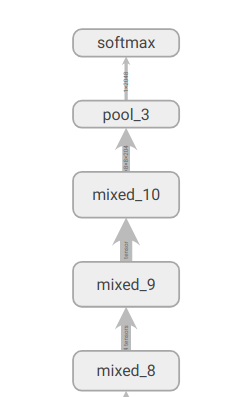
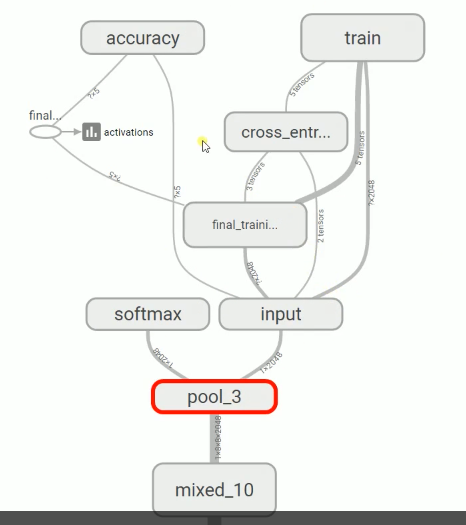
如果我現在有一個 10 分類問題, 我仍然可以利用 inception model 來做, 因爲 CNN 的前面層都可以理解爲是獲取 feature map. 那麼這個對圖片來說是通用的. 我只需放棄最後一層的 softmax, 換成我需要的一個小 NN 網絡, 把所有 inception 前面的層都看成是對我的輸入數據做特徵轉換, 這個特徵轉換會得到一個 'code', 他是 pool_3 的輸出. 原理如下图示:
1.2 hub 预置算法框架介绍
代码位置:
…./hub/examples/image_retraining/retrain.py
                   xxx.pb     模型     \
                   yyy.pbtxt  数值-uid  | --------+
                   zzz.txt    uid-描述 /          |
                                                  |
                                                  | model.tgz
                                                  |

                                    /+--+    /+--+    /+--+    /+--+
                                   +-+-+|   +-+-+|   +-+-+|   +-+-+|
                       ........    |   |/   |   |/   |   |/   |   |/  .....
                       .           +---+    +---+    +---+    +---+
                       .      inception    resnet  imagenet   a3c
             last layer.      _v3
             transform .                               |
                       .                               |  model_dir, the dir of downloaded tgz file of pretrained model                                                 test data set
                       .                               |                                                                                                                /
                       .                               |         ----------------------| output xxx.pb                                                       session   /
                       .                               v        /                      |                       1. open .pb                                 +----------/+
                       .                        +--------------+                       v                       2. graph_def parse graph      *   graph     |         / |
  like this       your own    image_dir         |              |     output_graph                                 from .pb                  / \            |        |  |  output
    +----<-       Data set  ---------------->   |  retrain.py  | < --------------- a dir used to store --------------------------------->  *   *      ---> |run(_ , _ )| --------> test labels
    |                  .                        |              |                   the new NN model            3. import graph_def         |   | \         |   /       |
    |                  .                        +--------------+                   suit for your task,            as it was defined        *   *  *        |  /        |
    v               to .                          ^        ^   +--------------+    "xxx.pb" file                  by us                                    +-/---------+
    |                  .                          |        |                  v                                                                             /
    |                  .          bottleneck_dir  |        | output_labels                                                                                 /
    |             code vector  -------------------+        +---------------- a dir uesd to                                                                /
                  files        1 vector 1 file                               store all parsed                                                            get tensor by name
train_data                     same architechture with                       labels from image_dir
    |- cars                    img dir                                       "yyy.txt" file, like
         |- car1.jpng                                                        "cars
         |- car2.jpng                                                         animals
         |- car3.jpng                                                         flower"
         |- car4.jpng
         |- ...

    |- animal
         |- animal1.jpng
         |- animal2.jpng
         |- animal3.jpng
         |- animal4.jpng
         |- ...

    |- flower
         |- ...
最方便的是, tensorflow 的 hub 提供了源码文件通过 transfer learnning 来帮你达此目的, 你只需要简单指定几个参数:
image_dir: 你的训练集图片(一个分类一个文件夹)存放路径bottleneck_dir: 存放 'bottleneck code' 的文件夹路径(与上面图片一一对应的 txt 文本)model_dir: 模型的压缩包所在文件夹路径output_graph: 训练好的图的存放路径(用于 tensorboard 可视化)output_labels: 通过(1)获取的标签
--bottleneck_dir <目錄存放每個image轉換到pool_3的code>
--how_many_training_steps 200 \
--model_dir <你下載的與訓練模型的壓縮包的目錄, 注意他只認壓縮包>
--output_graph <訓練好的圖的存放路徑> \
--output_labels <labels 存放路徑> \
--image_dir <你想輸入的圖片路徑, 該目錄下包含的文件夾會被當成分類名>
            所以他最好是這樣的目錄結構:
            data --+
                   |- cars --+
                             |- car1.jpng
                             |- car2.jpng
                             |- car3.jpng
                             |- car4.jpng
                             |- ...

                   |- animal-+
                             |- animal1.jpng
                             |- animal2.jpng
                             |- animal3.jpng
                             |- animal4.jpng
                             |- ...

                   |- flower-+
                             |- ...
经过程序运行后, 会在指定的 bottleneck_dir 中生成每张图对应的 code, 格式如下.
每个image 文件都会经过 inception 从input到pool-3(输出层前一层) 输出为一个高维
vector, 我们可以将其理解为特征转换.

#+BEGIN_EXAMPLE
data --+                             bottleneck_dir-+
       |- cars --+                                  |- cars --+
                 |- car1.jpng                                 |- car1.jpng_httpxxxxx_vector~1.txt
                 |- car2.jpng                                 |- car2.jpng_httpxxxxx_vector~1.txt
                 |- car3.jpng                                 |- car3.jpng_httpxxxxx_vector~1.txt
                 |- car4.jpng                                 |- car4.jpng_httpxxxxx_vector~1.txt
                 |- ...                                       |- ...

       |- animal-+                                  |- animal-+
                 |- animal1.jpng                              |- animal1.jpng_httpxxxxx_vector~1.txt
                 |- animal2.jpng                              |- animal2.jpng_httpxxxxx_vector~1.txt
                 |- animal3.jpng                              |- animal3.jpng_httpxxxxx_vector~1.txt
                 |- animal4.jpng                              |- animal4.jpng_httpxxxxx_vector~1.txt
                 |- ...                                       |- ...

       |- flower-+                                  |- flower-+
                 |- ...                                       |- ...
(require 'ob-async)
ob-async
实例运行下面的 shell script 执行程序, 得到模型和标签
#!/usr/bin/zsh
python /home/yiddi/git_repos/on_ml_tensorflow/retrain.py \
--bottleneck_dir bottleneck \
--how_many_training_steps 200 \
--model_dir /home/yiddi/git_repos/on_ml_tensorflow/inception_model \
--output_graph /home/yiddi/git_repos/on_ml_tensorflow/pretrained_transfer_model/output_graph.pb \
--output_labels /home/yiddi/git_repos/on_ml_tensorflow/pretrained_transfer_model/output_labels.txt \
--image_dir data/train/
Converted 2 variables to const ops.
python /home/yiddi/wellknown_proj_sourcecode/hub/examples/image_retraining/retrain.py \
google 提供的用於 transfer learning inception-v3 的源代碼